Introduction
Thank you for purchasing VZEX AI. This comprehensive guide will help you install, configure, and manage your AI Image Tools platform. VZEX AI is built to be simple, fast, and powerful.
Server Requirements
VZEX AI runs on standard PHP hosting. For AI processing, it uses the Replicate API, so you don't need expensive GPU servers yourself.
PHP Version
PHP 8.1 or higher (Recommended)
Database
MySQL 5.7+ or MariaDB 10.3+
Extensions
PDO, cURL, GD, OpenSSL, Mbstring, JSON, Fileinfo
Installation Guide
Our automated installer makes setup easy. Follow these steps carefully.
1. Upload Files
Extract the downloaded ZIP file. Upload the contents of the VZEX_AI_Script_v1.0
folder to your server's public_html directory.
.htaccess. The
.env file will be generated automatically.
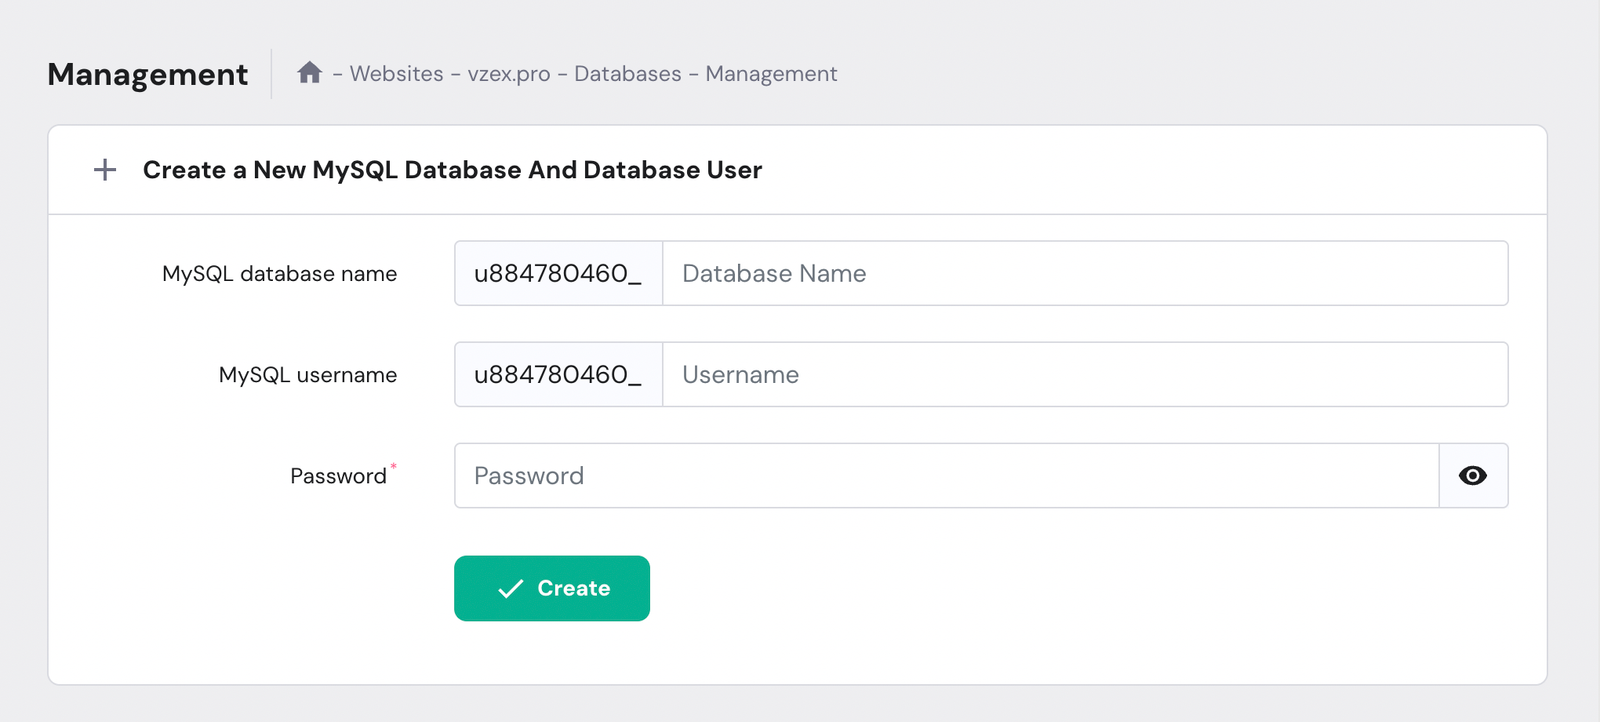
2. Create Database
Log in to your hosting control panel (cPanel) and create a new MySQL Database and User. Grant explicit "ALL PRIVILEGES".
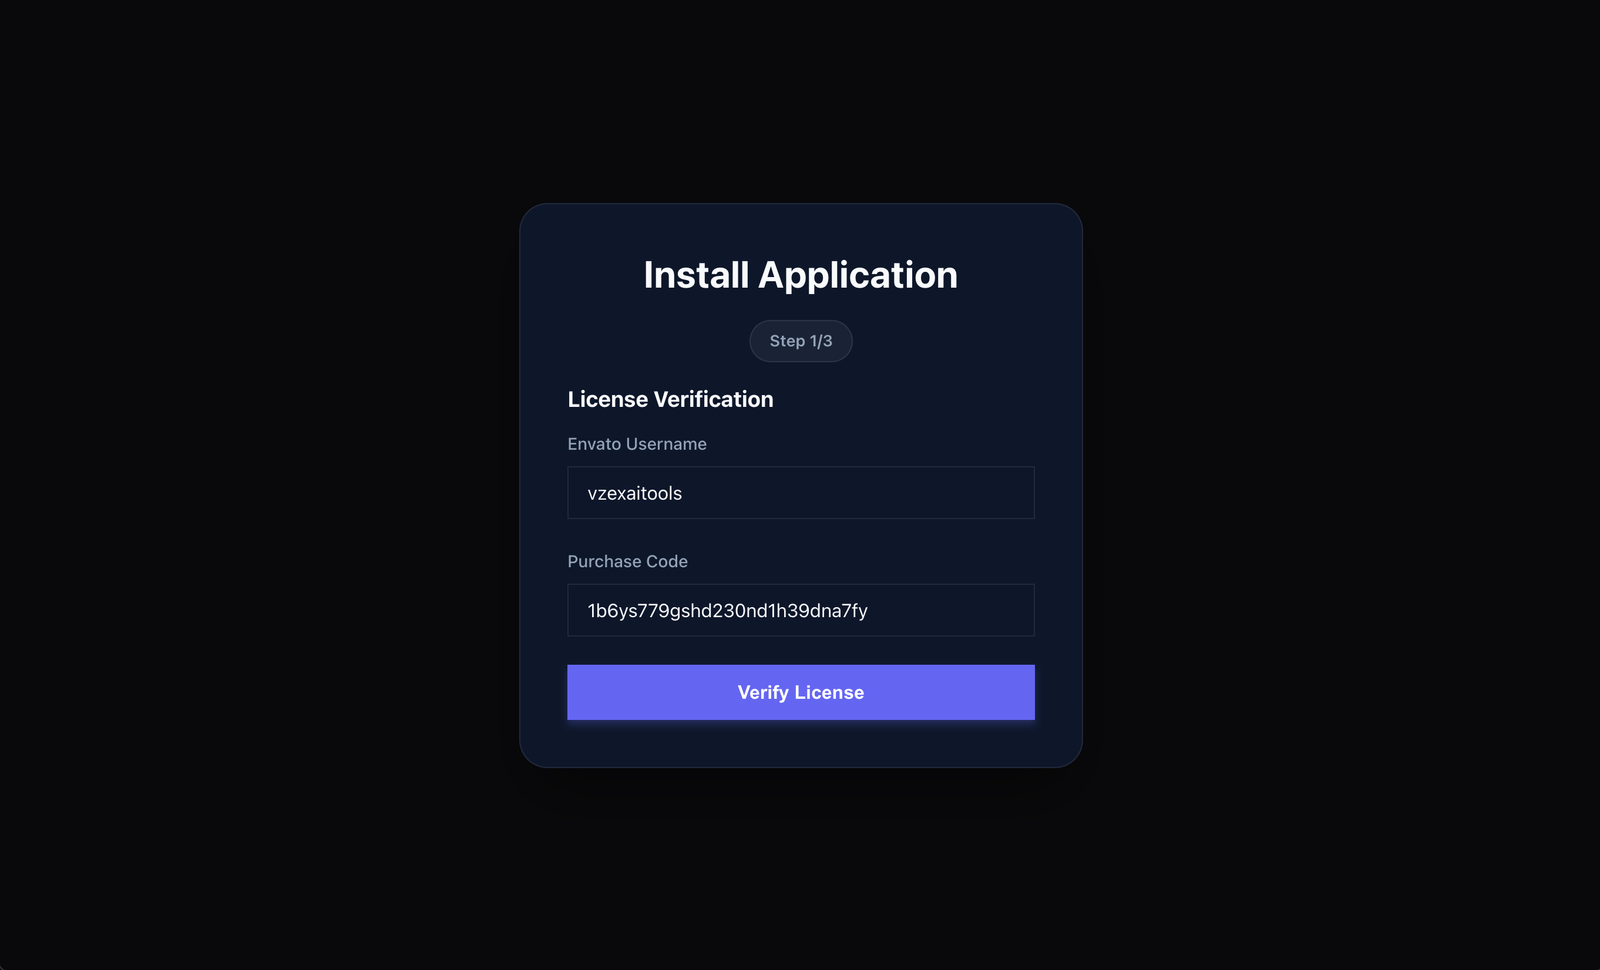
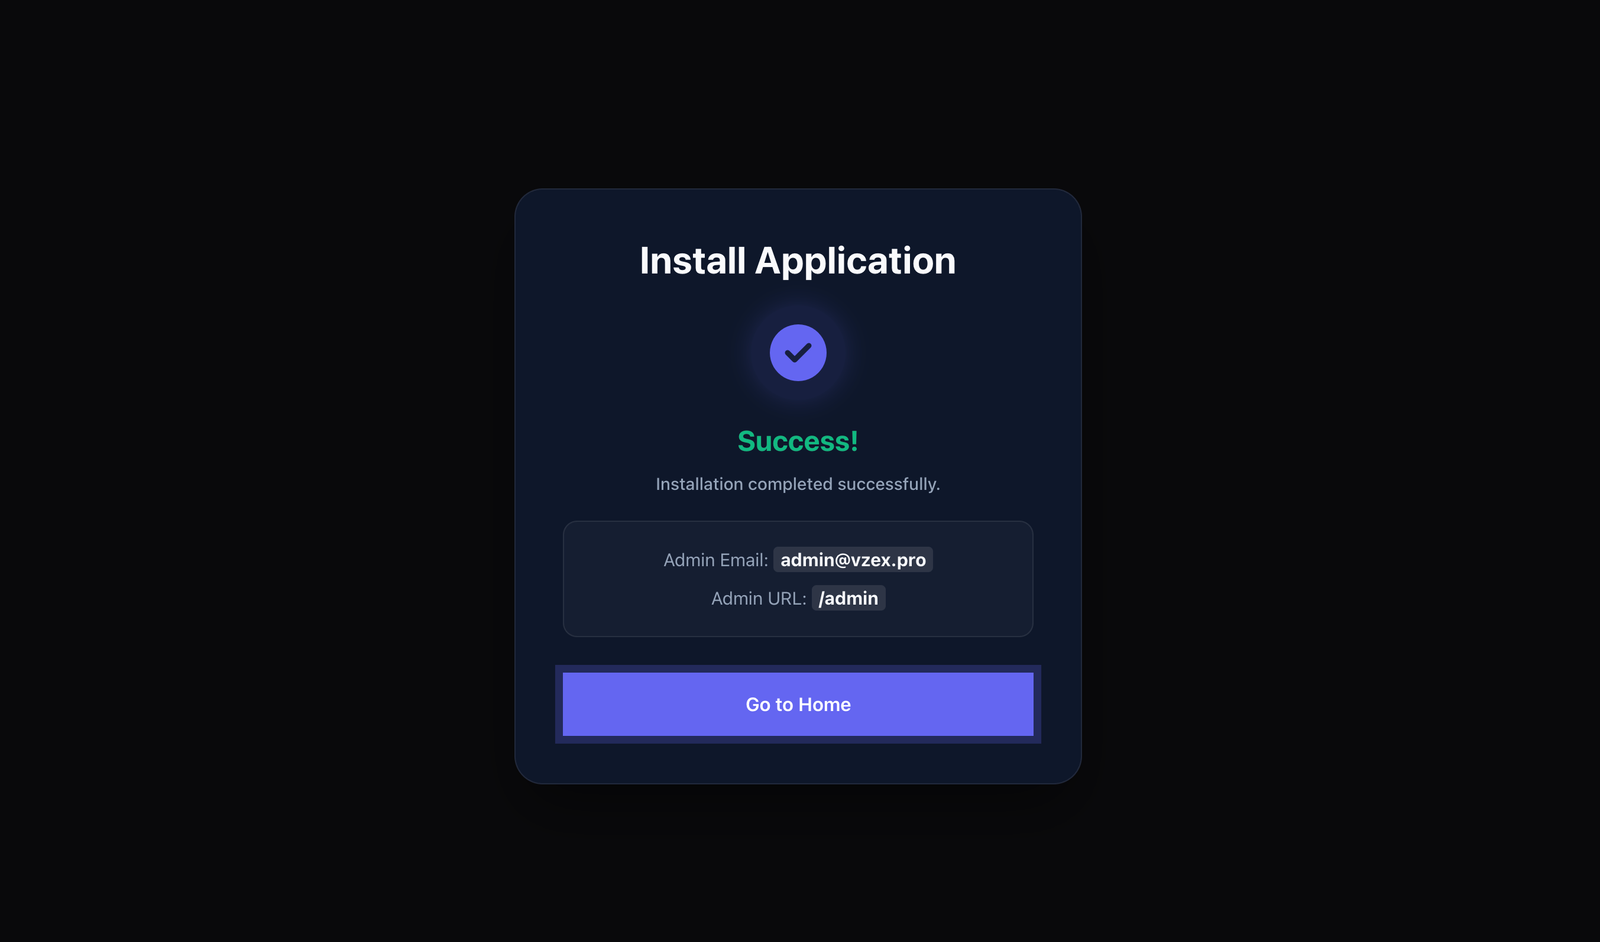
3. Run Installer
Visit your domain (e.g., https://yourdomain.com/install). You will see the Welcome
Screen.
Step 1: License Verification
Enter your Envato Purchase Code & Username.
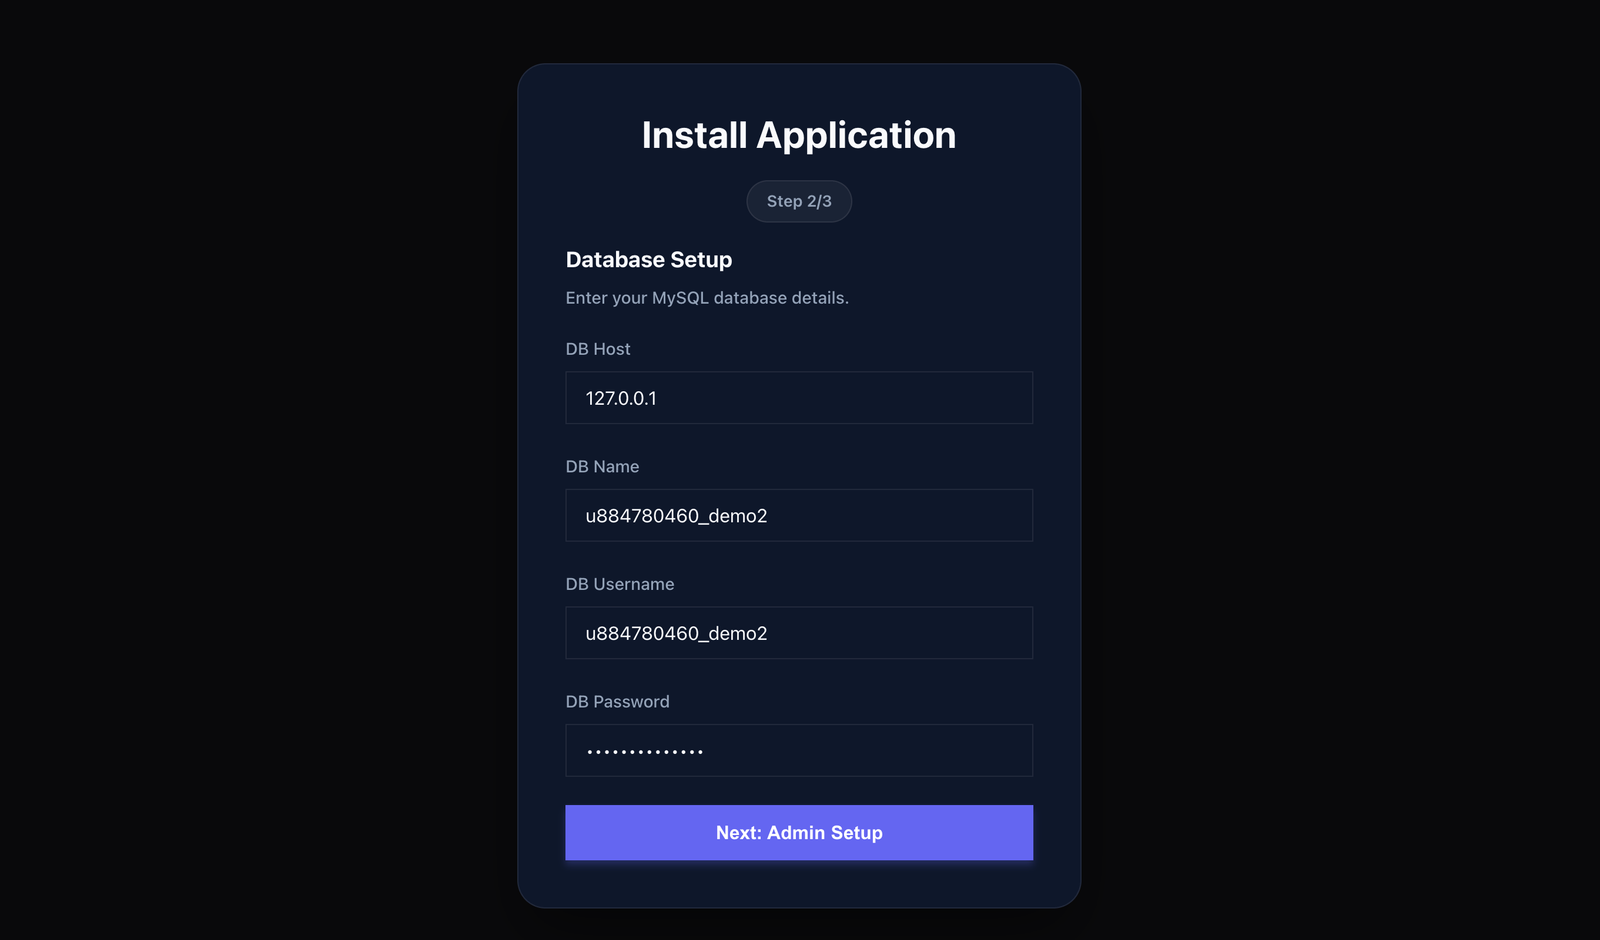
Step 2: Database Connection
Enter your Database Credentials (Host, DB Name, User, Password).
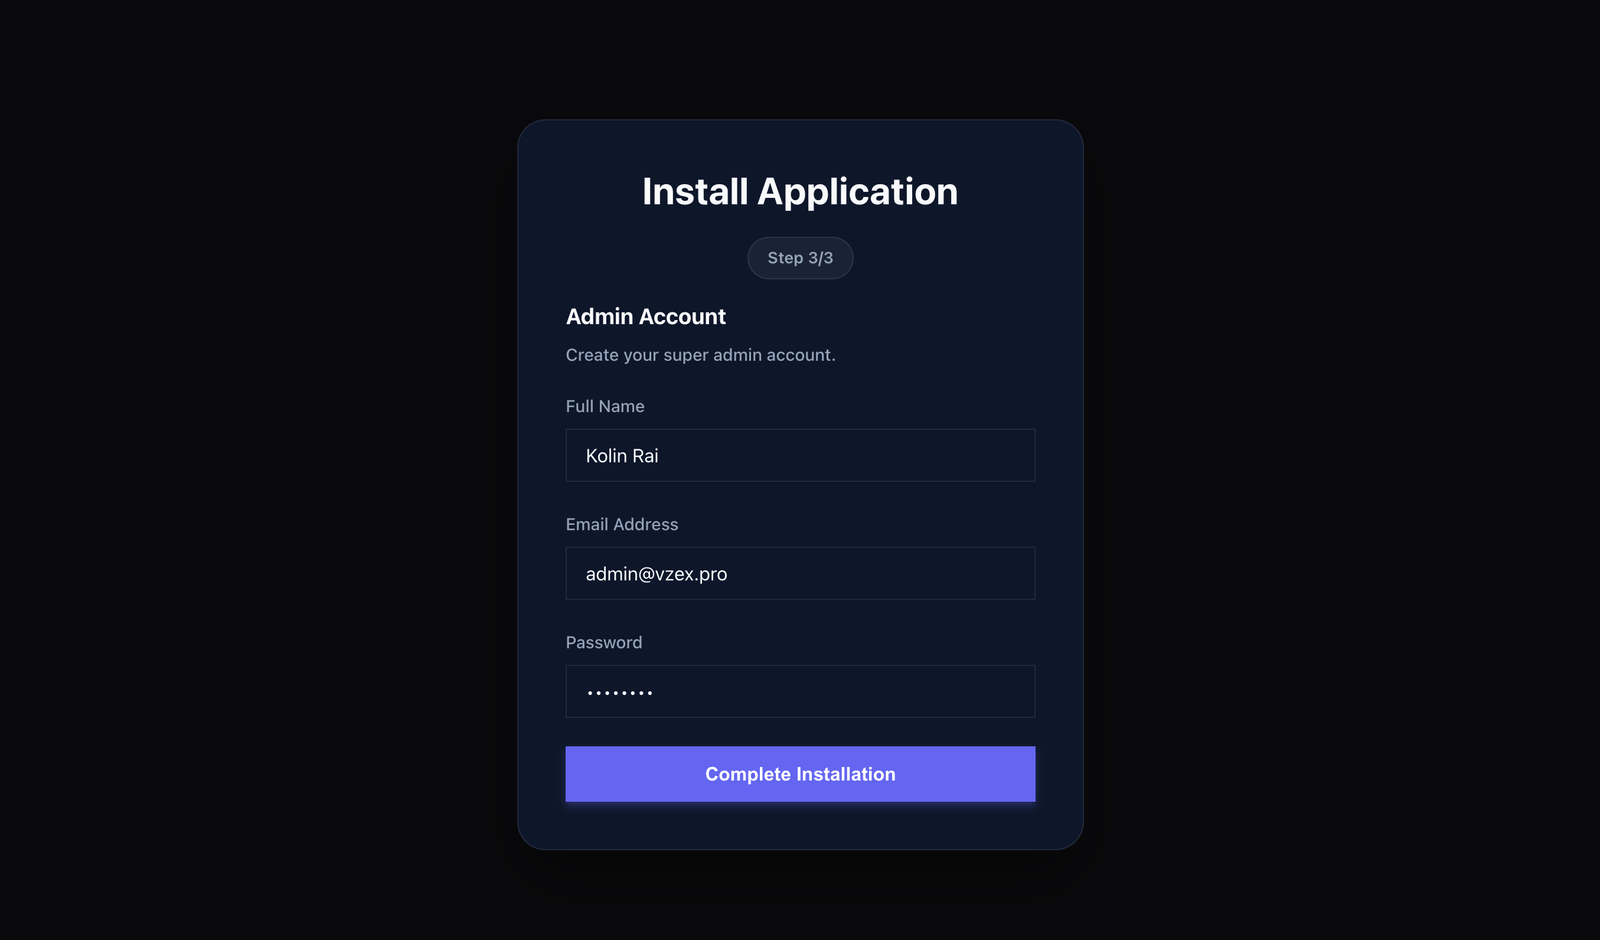
Step 3: Admin Account
Create your Super Admin Account (Email & Password).
Step 4: Success
Successfully Installed (https://yourwebsite.com/admin).
Admin Panel Guide (A-Z)
A complete walkthrough of every feature in your dashboard.
Dashboard Overview
The dashboard provides a bird's-eye view of your platform's performance.
- Total Users: Registered users count.
- Jobs Generated: Total successful AI generations.
- Earnings: Revenue from Stripe/PayPal.
- Recent Users: List of the latest signups.
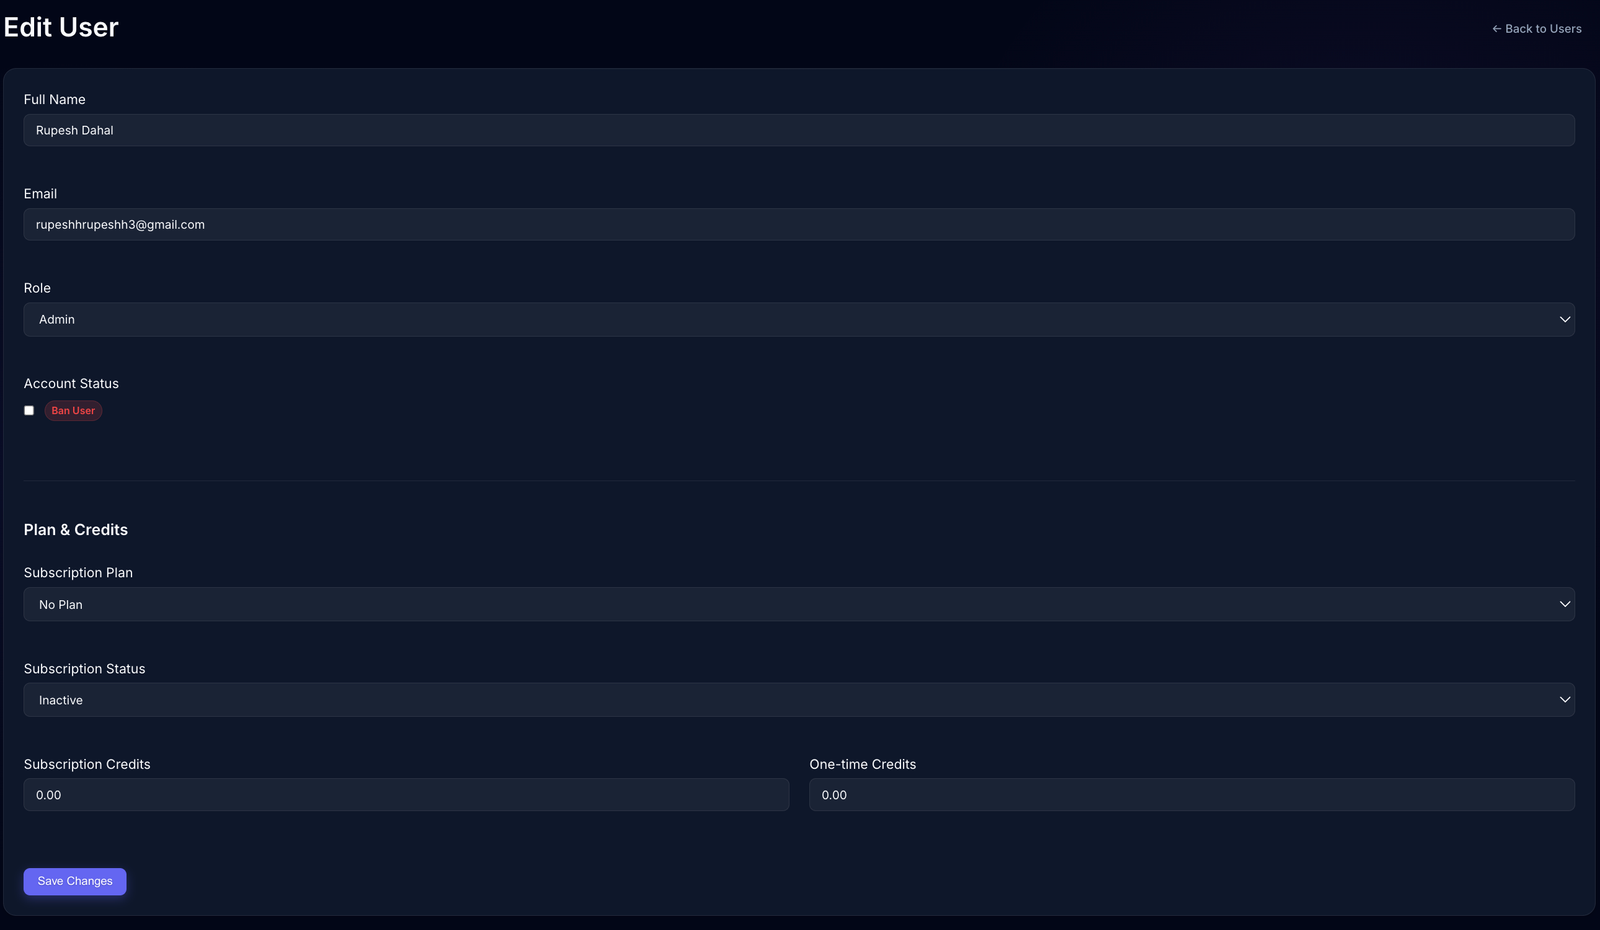
User Management
Navigate to Users to manage your member base.
Edit Profile & Credits
Click the (Edit check) button next to any user to:
- Add/Remove Credits: Manually top-up a user's balance.
- Change Role: Promote a user to Admin or demote to User.
- Ban User: Suspend access for account policy violations.
- Verify Email: Manually mark an email as verified.
Home Page Editor
Navigate to Settings > Home Editor. This is a powerful visual builder for your landing page.
Canvas Background
Control the animated background effect to wow your visitors.
- Visual Style: Choose from Nebula, Constellation, Aurora, Prism, or Cosmos.
- Colors: Set custom primary and secondary colors (supports Gradients).
- Intensity: Control particle speed and density (Low/Medium/High).
Content Sections
- Hero Section: Edit the main H1 Title and Subtitle.
- Stats Counter: Customize the 4 stats shown (e.g., "5M+ Images").
- Features: Edit the 3 main feature columns with titles/descriptions.
- How It Works: Customize the 3-step process guide.
- Showcase: Rename the "Before/After" gallery section.

Branding & SEO
Navigate to Settings > SEO & Branding.
Visual Branding
- Site Identity: Set Site Name, Footer Text, and Company Info (Address/Email).
- Logos: Upload your Light Logo, Dark Logo, and Favicon directly here.
SEO Configuration
- Global SEO: Set the default Meta Title, Description, and Keywords for the home page.
- Per-Tool SEO: Customize the Page Title, H1 Tag, and Meta Description for each specific tool (e.g., "AI Background Remover" instead of generic text).
Email & SMTP Settings
Navigate to Settings > Email. Configuring this is crucial for verification and password resets.
SMTP Configuration
Port: 587 (TLS) or 465 (SSL)
User: your@email.com
Pass: your-app-password
Email Templates
You can enable/disable and customize the following automated emails (HTML supported):
- Welcome Email: Sent immediately after signup.
- 7-Day Reminder: Sent 7 days before subscription expiry.
- 1-Day Warning: Sent 24 hours before expiry.
- Expired Notice: Sent when the plan ends.
Use the "Send Test Email" tool at the bottom of the page to verify your SMTP connection.
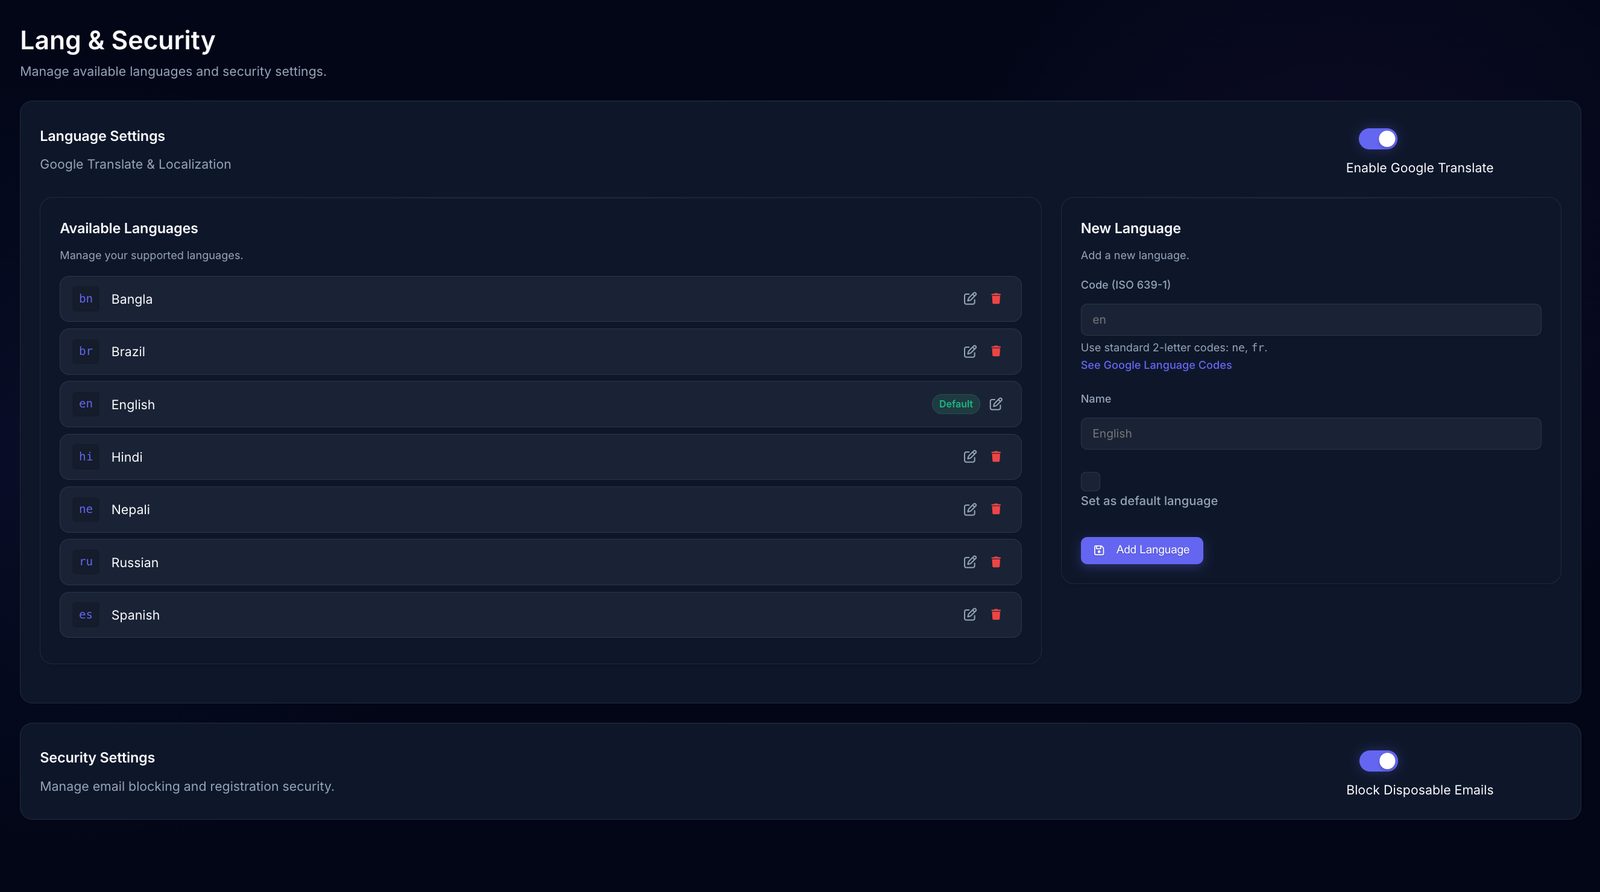
Language & Security
Navigate to Settings > Lang & Security.
Language Management
- Google Translate Mode: Enable this to automatically show a language switcher powered by Google.
- Manual Localization: Add new languages (e.g., 'es', 'fr') and set one as Default.
Security
- Disposable Email Blocker: Enable this to block registration from temp-mail services (e.g., yopmail, temp-mail.org). This prevents spam signups.
Tools & Ads
Tools Management
Navigate to Settings > Tools. Here you can:
- Enable/Disable: Turn off specific tools (e.g., Face Restoration) if you don't want to offer them.
- Set Costs: Define how many credits each tool costs (e.g., Remove BG = 0.5 credits).
Ad Management
Navigate to Settings > Ads. You can paste HTML/JS codes (AdSense) in 3 slots:
- Header Ad: Appears above the nav or top of pages.
- Footer Ad: Appears at the bottom.
- Body Ad: Appears near tool results.
content Management
Blog Management
Navigate to Blog. A full CMS for your site.
- Create Posts: Rich text editor for articles.
- Categories & Tags: Organize your content for SEO.
- Status: Save as Draft or Publish immediately.
Custom Pages
Navigate to Pages. Manage static content like "About Us" or "Privacy Policy".
- System Pages: Edit default pages (cannot be deleted).
- New Pages: Create unlimited custom pages with their own slugs.
Other Features
User Interaction
- Contact Messages: View and reply to messages sent via the Contact form.
- Feedback: View user votes (Likes/Dislikes) on specific tools.
System & scripts
- Navigation & FAQs: Navigate to Settings > Head & Foot to manage Header/Footer menus, Social Links, and FAQ sections.
- Maintenance Mode: Enable this in Settings > System to close the site during updates.
Transactions (Payments)
Navigate to Transactions to view the payment history.
- View History: See all payments (Stripe, PayPal) with details like Transaction ID, Amount, and User.
- Action: You can delete transaction records if needed (this does not refund the payment).
API Configuration
Navigate to Settings > API Keys to connect third-party services.
1. Replicate API (Essential)
Required for all AI processing.
- Sign up at Replicate.com .
- Copy API Token from your dashboard.
- Paste it in the "Replicate API Key" field.
2. Stripe (Card Payments)
- Go to Stripe Dashboard > Developers .
- Copy Publishable Key and Secret Key.
- Webhook Setup:
- Endpoint:
https://your-site.com/payment/webhook - Required Events:
checkout.session.completedinvoice.payment_succeededcustomer.subscription.createdcustomer.subscription.updatedcustomer.subscription.deleted
- Endpoint:
price_... ID and paste
it into the Admin Panel when creating a plan.
3. PayPal (New)
- Go to PayPal Developer Dashboard .
- Create a Live App.
- Copy Client ID and Secret.
- Webhook Setup:
- Endpoint:
https://your-site.com/payment/webhook - Required Events:
PAYMENT.SALE.COMPLETEDBILLING.SUBSCRIPTION.ACTIVATEDBILLING.SUBSCRIPTION.UPDATEDBILLING.SUBSCRIPTION.CANCELLEDBILLING.SUBSCRIPTION.EXPIREDBILLING.SUBSCRIPTION.SUSPENDED
- Endpoint:
- Subscriptions: You MUST create a Plan in PayPal (Recurring) and paste the Plan ID.
- One-Time Packs: You DO NOT need a Plan ID. The system validates the price automatically. Leave the "PayPal Plan ID" field empty.
4. Google Login (OAuth)
To enable "Login with Google":
- Go to Google Cloud Console .
- Create OAuth Client ID (Web Application).
- Set Redirect URI:
https://your-site.com/auth/google/callback. - Paste Client ID and Secret.
5. Cloudflare Turnstile
Free, privacy-friendly Captcha replacement.
- Go to Cloudflare Turnstile .
- Add site and copy Site Key/Secret Key.
Cron Jobs (Automated Tasks)
This step is required. Without a Cron Job, the system cannot automatically expire user subscriptions or send reminder emails.
How to Setup (Hostinger / cPanel)
1. Open Cron Jobs
Log in to your hosting panel (Hostinger, cPanel, etc). Search for "Cron Jobs" and click to open it.
2. Select "Custom"
If you are on Hostinger, ensure you select the Custom type (not PHP). This allows you to run the required command.
3. Enter Command
Copy the command below and paste it into the "Command" box.
https://your-website.com with your actual
domain and YOUR_CRON_SECRET with the key found in your .env file.
4. Choose Frequency
Select "Once Per Day" (or 0 0 * * *) from the common settings. This
ensures user credits are reset daily.